
Concrete Vibrator: In the world of concrete, strength and beauty are born from density. A perfectly finished slab, a flawless foundation wall, or a set of crisp, durable steps all share a common, hidden secret: the complete absence of voids, pockets, and hidden weaknesses within their mass. While the average person might think concrete work is simply a matter of “mix, pour, and smooth,” the professional knows that the most critical step—the one that separates amateur work from a truly permanent structure—happens in the moments after the concrete is placed. This is the world of concrete vibration.
The concrete vibrator is the unseen hand, the indispensable tool that transforms a lumpy, air-filled mixture into a monolithic, rock-solid mass. It is the single greatest insurance policy against the long-term structural failures and cosmetic blemishes that plague poorly placed concrete. Using one is not merely an optional step for a “better” finish; it is a fundamental requirement for achieving the designed strength, durability, and aesthetic perfection of any significant concrete pour.
This is your ultimate guide to mastering this essential tool. We will journey deep into the “why” behind consolidation, dissect the anatomy of the tool itself, and provide a meticulous, step-by-step methodology for its correct use. We will explore advanced techniques, identify the common, costly mistakes to avoid, and reveal how a few minutes of proper vibration can guarantee a lifetime of structural integrity. Whether you are a serious DIYer building a foundation for a new workshop or a budding contractor looking to elevate your craft, this guide will empower you to eliminate weakness and build with the confidence that comes from creating truly flawless concrete.
Chapter 1: The “Why” Behind Vibration – The Science of Consolidation
To truly appreciate the concrete vibrator, you must first understand the chaotic world of freshly mixed concrete. On a microscopic level, a batch of concrete is a jumble of coarse aggregate (gravel), fine aggregate (sand), cement particles, and water. Crucially, it also contains a significant amount of entrapped air—up to 20% of its volume. These are not the microscopic, beneficial bubbles from an air-entraining admixture; these are large, irregular pockets of air trapped during the mixing and pouring process.
If left in place, these air pockets become permanent voids as the concrete hardens. This is catastrophic for two reasons:
- Massive Reduction in Strength: Voids are, by definition, empty spaces. They are weak points. A general rule of thumb in concrete engineering is that for every 1% of entrapped air, the concrete’s compressive strength is reduced by approximately 5%. This means that a pour with just 5% avoidable voids could be 25% weaker than it was designed to be.
- Pathways for Water Intrusion: These voids create a network of channels within the concrete. In freeze-thaw climates, water can enter these voids, freeze, expand, and slowly destroy the concrete from the inside out—a process known as spalling. This also dramatically reduces the concrete’s ability to protect embedded steel reinforcement (rebar) from rust and corrosion.
Enter the Concrete Vibrator.
A concrete vibrator works by imparting thousands of high-frequency vibrations (typically 10,000 to 15,000 vibrations per minute – VPM) into the wet concrete. This intense energy does two magical things:
- It Liquefies the Mix: The vibrations temporarily break the friction between the aggregate particles, causing the stiff, lumpy concrete to behave like a liquid. This is known as “plasticity.”
- It Harnesses Gravity: In its temporarily liquefied state, the mix is free to settle. The heavier aggregates and cement paste are pulled down by gravity, filling every nook and cranny of the formwork. Simultaneously, the lighter entrapped air bubbles are forced up and out of the mix.
This entire process is called consolidation. The result is a dense, uniform, void-free mass that is significantly stronger, more durable, and has a much better surface finish. It ensures that the concrete fully encases the rebar, creating the powerful mechanical bond that is the basis of reinforced concrete.
Chapter 2: Anatomy of a Concrete Vibrator – Choosing Your Weapon
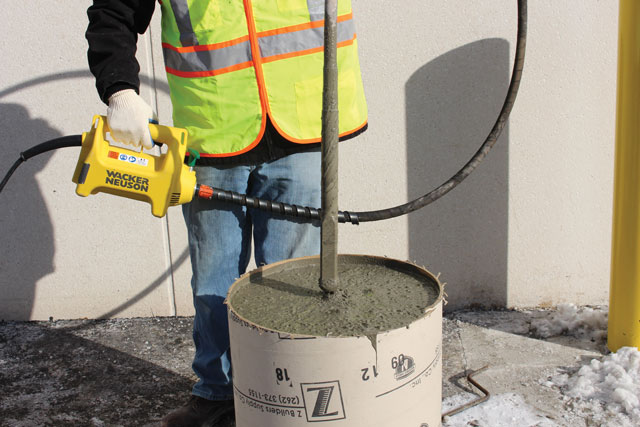
While there are various types of vibrators (like external form vibrators), the one most commonly used for walls, footings, columns, and slabs is the internal immersion vibrator, often called a “stinger” or “poker” vibrator. Understanding its components is key to using it effectively.
An internal vibrator consists of three main parts:
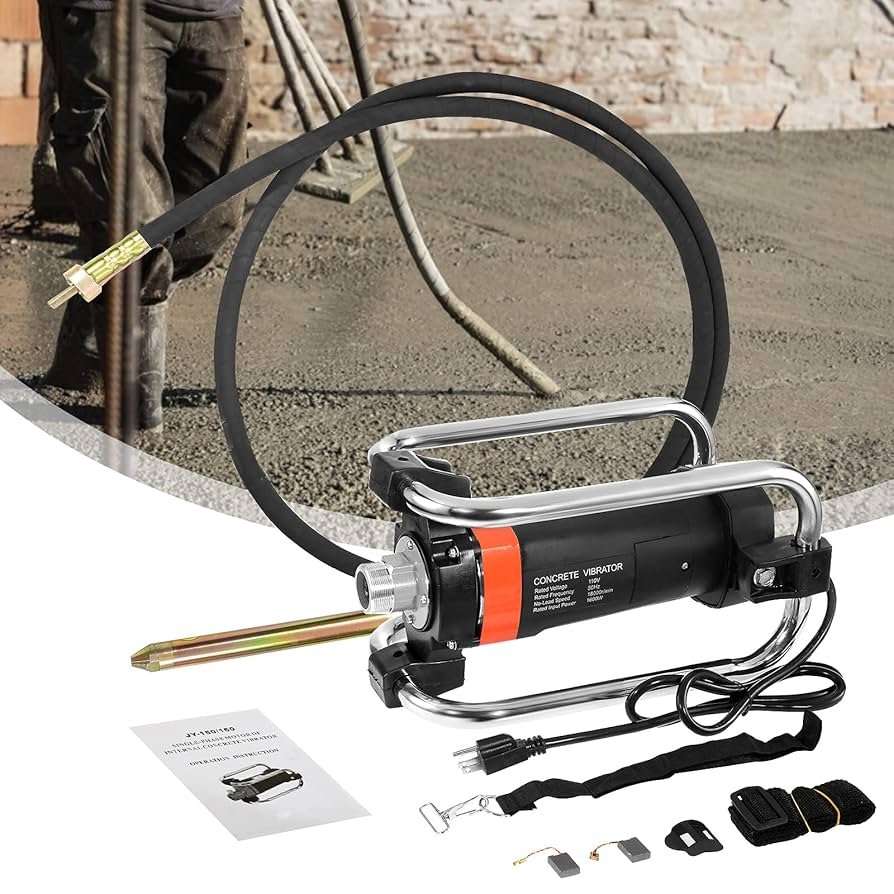
- The Motor: This provides the power. It can be electric (most common for general use), pneumatic (air-powered, used where electricity is hazardous), or gas-powered (for remote sites). Electric motors are the go-to for most DIY and residential projects.
- The Flexible Shaft (Whip): This is a flexible, heavy-duty driveshaft that connects the motor to the vibrator head. Shafts come in various lengths, typically from 3 to 20 feet, allowing you to reach the bottom of deep forms without having to stoop over.
- The Head (Poker): This is the business end of the tool. It’s a sealed steel cylinder that contains an eccentric, off-balance weight. When the motor spins the driveshaft, this weight rotates at high speed, causing the intense vibrations that consolidate the concrete.
Choosing the Right Head Size:
The diameter of the head is the most critical factor to consider when renting or buying a vibrator. The head size determines its radius of action—the diameter of the circle of concrete it can effectively consolidate.
- General Rule: The radius of action is roughly 4-5 times the diameter of the head.
- ¾ to 1-inch Head: Ideal for very thin or tightly constrained pours, like concrete countertops or projects with heavily congested rebar. Radius of action: ~3-5 inches.
- 1 ½-inch Head: A fantastic all-purpose size. Perfect for most residential applications like foundation walls, footings, and thick slabs. Radius of action: ~6-8 inches.
- 2 to 3-inch Head: These are larger, more powerful units for big commercial jobs like dams, large columns, and thick mat foundations. They are generally overkill and potentially damaging to standard residential formwork.
The Golden Rule of Selection: Choose a head that is small enough to fit easily between the rebar (a minimum of 1.5 times the head diameter clearance is ideal) but large enough to get the job done efficiently. For most DIYers, the 1 ½-inch head is the perfect sweet spot.
Chapter 3: The Pre-Vibration Checklist – Preparing for a Flawless Pour
Success with a concrete vibrator begins before it’s even turned on. A few minutes of preparation will save you from potential disaster.
1. Your Personal Protective Equipment (PPE) is Non-Negotiable:
- Safety Glasses/Goggles: Wet concrete can splash unexpectedly.
- Alkali-Resistant Gloves: Wet concrete is caustic and causes severe chemical burns.
- Rubber Boots: You will be standing near or in wet concrete.
- Hearing Protection: The combination of a concrete truck, mixer, and vibrator is extremely loud.
- Long Sleeves and Pants: Protect your skin from burns.
2. Inspect Your Equipment:
- Electric Cord: Check the motor’s power cord for any frays or damage. Ensure you are plugging into a GFCI (Ground Fault Circuit Interrupter) protected outlet.
- Shaft and Head: Look for any cracks or damage to the flexible shaft or the head itself.
- Test Run: Before the concrete arrives, turn the vibrator on for a few seconds in the air to ensure it runs smoothly. Never run a vibrator out of the concrete for more than a few seconds. The concrete itself acts as a coolant for the head; running it in the air for extended periods can cause it to overheat and fail.
3. The Most Critical Check: Your Formwork:
A concrete vibrator turns your static concrete mix into a liquid. This liquid mass exerts a massive, temporary pressure on your formwork called “hydrostatic pressure.”
- Inspect Every Joint: Check all your form seams, corners, and connections. Are they securely screwed together?
- Check Your Bracing: Push firmly on the forms. They must be rock-solid and show no signs of movement. The vibrator will exploit any weakness. A “blowout”—where a form bursts open under pressure—is a catastrophic, unrecoverable mess. You cannot over-brace your forms. If they look flimsy, add more bracing before the concrete truck arrives.
Chapter 4: The Art of the Technique – A Step-by-Step Guide to Perfect Vibration
This is the core of the craft. Follow these steps methodically for every pour. The goal is systematic, complete consolidation without overdoing it.
Step 1: Place the Concrete Strategically
Don’t just pour all the concrete in one spot. Place it in “lifts”—manageable layers, typically 12 to 18 inches deep. The vibrator should be able to penetrate the full depth of the lift and about 4-6 inches into the previous lift below it to knit them together.
Step 2: The Insertion – Fast and Vertical
- Turn the vibrator on before it enters the concrete.
- Insert the vibrator head into the concrete quickly and let it sink under its own weight.
- Always insert the head vertically. Do not lay it horizontally, as this is inefficient and can trap air beneath it.
Step 3: The Dwell Time – Watch for the Signs
This is the most crucial judgment call you will make. You must leave the vibrator submerged just long enough to consolidate the concrete in its radius of action. How do you know how long that is? You watch the concrete, not the clock.
- The typical dwell time is 5 to 15 seconds.
- The Signs of Proper Consolidation:
- A rush of large air bubbles will immediately rise to the surface around the vibrator head.
- The concrete in the area will suddenly slump and liquefy.
- The sound of the vibrator motor will change slightly, taking on a more stable, higher-pitched hum as the load becomes consistent.
- The bubbles will stop, or the bubbles that do appear will be very small.
- A slight, glossy sheen will appear on the surface of the concrete around the vibrator.
Once you see that sheen and the large bubbles have stopped, the job in that spot is done.
Step 4: The Withdrawal – Slow and Steady
Withdrawing the vibrator too quickly will leave a hole that won’t fill in, creating a void.
- The ideal withdrawal rate is about 3 inches per second. A good rule of thumb is to pull it out slowly enough that the hole completely closes up behind the head as it comes out.
Step 5: The Overlap – Systematic Coverage
To ensure the entire form is consolidated, you must overlap your insertion points.
- Move to your next insertion point, typically 1.5 times the radius of action from the last one. For a 1 ½-inch head with a 6-inch radius, this means your insertion points should be about 9-12 inches apart.
- This overlap ensures that there are no “dead spots” of unconsolidated concrete between your insertion points.
- Work in a systematic grid pattern across the entire pour. Don’t just randomly stab at the concrete.
Chapter 5: Advanced Techniques and Special Considerations
- Vibrating Walls: Work in lifts. Ensure your vibrator head penetrates a few inches into the previous lift to bond them together seamlessly. Be extra vigilant about form strength.
- Vibrating Slabs (over 6 inches thick): For thick slabs, a vibrator is essential. Use the same systematic grid pattern. For slabs thinner than 6 inches, consolidation is often achieved through screeding and tamping, but a brief vibration can still be beneficial.
- Vibrating Around Rebar: The vibrator is your friend here. It helps the concrete flow and tightly grip the rebar. It’s okay to let the vibrator head briefly touch the rebar to transfer vibrations along it, but do not use the vibrator to physically push rebar into place. Ensure you vibrate on both sides of dense rebar curtains to prevent shadows and voids.
- A Cardinal Sin: Never Use the Vibrator to Move Concrete.
The vibrator is a consolidation tool, not a placement tool. Do not use it to push a pile of concrete horizontally across the form. This will cause segregation, where the heavy aggregate separates from the sand and cement paste, creating weak spots and a poor finish. Place the concrete with a rake or shovel to where it needs to go, then vibrate it.
Chapter 6: Avoiding the Pitfalls – Common Mistakes That Ruin Concrete
Knowing what not to do is just as important as knowing what to do.
1. Under-Vibration:
- The Cause: Fear of over-vibrating, pulling the vibrator out too soon, or having insertion points too far apart.
- The Result: The most common cause of cosmetic and structural defects. It leaves behind significant entrapped air, resulting in honeycombing (rough, stony patches on the surface where the mortar did not fill the spaces between the aggregate), reduced strength, and poor durability.
- The Fix: Trust the visual cues. Wait for the bubbles to stop and the sheen to appear. Use a proper overlap pattern.
2. Over-Vibration:
- The Cause: Leaving the vibrator in one spot for too long (e.g., 30+ seconds).
- The Result: This can cause segregation. The heavy aggregate sinks to the bottom, and a weak, watery layer of sand and cement (laitance) forms at the top. The surface will be weak, prone to dusting, and may craze-crack. You will see a “soupy” pool of water and fine material forming on the surface.
- The Fix: As soon as you see the signs of proper consolidation, get out. 5 to 15 seconds is a guideline; let the concrete tell you when it’s done.
3. Dragging the Vibrator:
- The Cause: Laziness. Trying to consolidate a large area by dragging the vibrator horizontally through the concrete.
- The Result: This is wildly inefficient and traps air, as the top layer liquefies but the bottom remains stiff. It also encourages segregation.
- The Fix: Always use the vertical in-and-out method with a systematic grid pattern.
4. The “Cold Joint”:
- The Cause: Waiting too long between pouring lifts, allowing the lower layer to partially set before the next layer is poured on top.
- The Result: The vibrator will be unable to knit the two lifts together, creating a “cold joint”—a weak, un-bonded plane within the wall that is prone to leaks and structural failure.
- The Fix: Plan your pour to be continuous. When pouring a new lift, make sure the vibrator penetrates several inches into the still-plastic concrete of the lift below.
Chapter 7: Post-Vibration – The Road to a Perfect Finish
Proper vibration doesn’t just improve strength; it makes the finishing process infinitely easier and more effective.
- A Solid Canvas: Because you have brought the “cream” of the concrete (the fine cement and sand paste) to the surface, you have a perfect canvas for troweling.
- Easier Screeding: The liquefied concrete is much easier to screed and level.
- Less Finishing Work: With no honeycombing or major voids to patch, your final surface will be smooth and uniform right out of the forms.
- Wait for the Bleed Water: Remember that vibration brings water and air to the surface. After you have finished vibrating and screeding, you must wait for this “bleed water” to disappear before you begin any floating or troweling. Finishing with bleed water on the surface will result in a weak, flaky top layer.
Conclusion: From a Simple Tool to a Guarantee of Quality
The concrete vibrator is the ultimate symbol of professional intent. It is a declaration that you are not just placing concrete; you are engineering a structure. It is the tool that takes a simple recipe of stone, sand, cement, and water and transforms it into a dense, predictable, and permanent building material.
By understanding the science, respecting the tool, and mastering the technique, you elevate your work from a simple DIY project to a craft. You build not just for the present, but for the decades to come, confident that the unseen core of your creation is as flawless and as strong as the surface you so carefully finished. In the world of concrete, true beauty is density, and the vibrator is the hand that sculpts it.


